
Having a humidifier at home can be great when your home is in a dry climate area. Also, in winter, when all the heat has dried the air, a humidifier is effective. When the air is too dry, it may cause serious skin drying, lips cracking, and even breathing issues.
When you need to moisten your home air using a humidifier, the Dyson humidifiers will be the most effective option. It can serve you in the long term to solve your respiratory problem and ensure your lips will never get dry.
But to get the best performance from a Dyson humidifier, it requires frequent cleaning. So, what are the processes of cleaning a Dyson humidifier?
Let’s take a closer look at the Dyson humidifier maintenance.
Step by Step Process of Cleaning Dyson Humidifier
Dyson humidifier cleaning instruction is pretty straightforward. Follow the below step by step process.
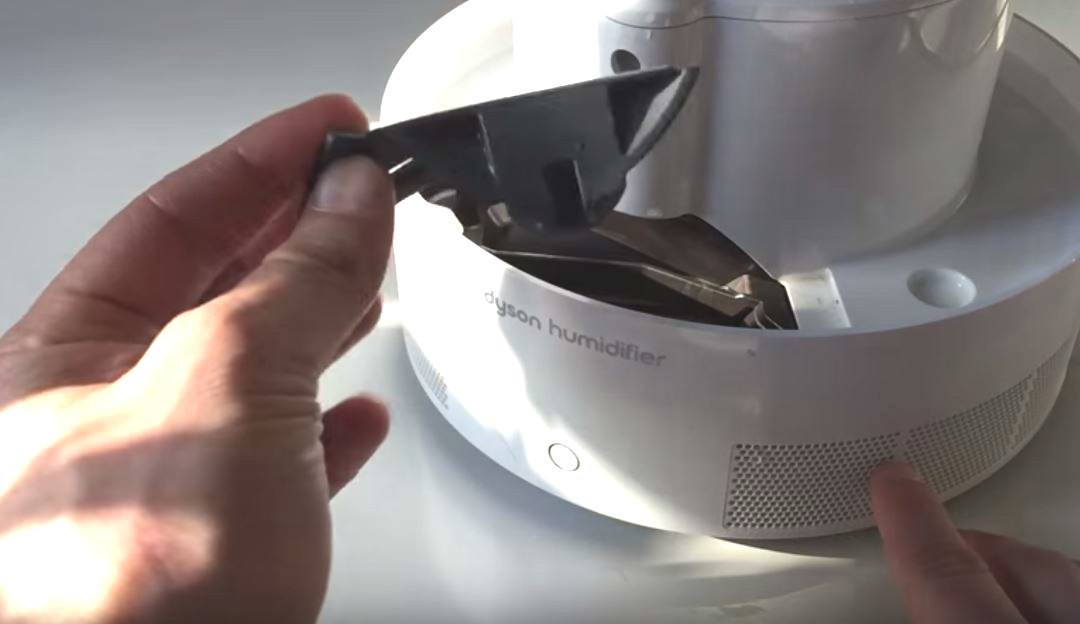
Step 01: Disassemble the humidifier
First, the humidifier needs to be unplugged. Every humidifier contains a water tank. Then remove the water tank. Take a dry cloth. Make sure to wipe away remaining water from the bottom.
Step 02: Drain Water from the Water Container
Now unscrew the water container plug. This way, all water will get drained from the water container.
Step 03: Removing the Chimney and Seal
The next humidifier parts that you will need to remove is – the water tank chimney. Loosening a water tank chimney is so simple. Clockwise twisting to the chimney dial at a 90° angle will allow you to remove the chimney. Then remove the seal. Use your one hand to pinch the tab together and lift it out directly.
Step 04: Pour Citric Acid Solution into the Humidifier
Then you have to make a solution of water and citric acid. Take powdered citric acid – 30 g and water – 1 ltr. Stir the solution well to make sure it mixes perfectly. Pour the solution into the water trough and fill it up to the piezo and UV-C emitter level. Then soak the water chimney, rubber seal and trough seal into the solution. Then wait for the next 15 minutes.
Step 05: Take away All the Parts from the Solution
After 15 minutes:
- Empty the trough.
- Take away all the parts that have been merged into the citric acid solution.
- Rinse all the humidifier components under running warm water.
- Take a dry cloth and wipe away all water thoroughly.
Moreover, giving the parts an air dry is also a suitable option.
Step 06: Wiping the Amp and Upper Assembly of the Humidifier
This step is to remove the surrounding from the amp assembly. Pulling and lifting the bottom outwards, you can remove it comfortably. Then soak a soft cloth in the citric acid solution. Ensure wiping the upper assembly and amp edges with the wet cloth. Wipe down the surroundings of the amp assembly too.
Step 07: Pour the Solution into the Water Container
Whatever balance solution you have, pour all the solution into the water tank. Now, you will have to give a good shake and ensure replacing of the water container’s plug. Thus, the citric acid solution will not get leaked. With the solution, give the water tank a well-shake at least for 30 seconds. All loosen particles inside of the tank will get cleaned. After 30 minutes, place the tank in an upright position and leave it for the next 15 minutes.
Step 08: Reassemble the Humidifier after thorough Cleaning.
Once 15 minutes are passed, throw away the citric acid solution from the water tank. Then fill it up with cold water. Again give it a good shake for 30 seconds and then empty the cold water.
Then ensure reassembling of the humidifier components.
Last Words
A humidifier is an essential item for many people. Dyson humidifier is an awesome thing that can fulfill a person’s requirement to moisten the air. When the cleaning process is maintained properly, it can deliver the best result without showing any issue.
Ensure cleaning the Dyson Humidifier at least once a week.


