The epoxy floor is one of your favorite floors in your home for obvious reasons. It is shiny, smooth with beautiful patterns, and it gives you a comfortable cleaning time.
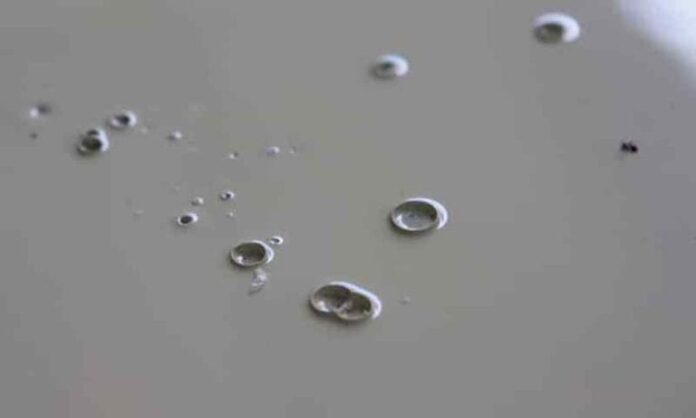
But you have recently discovered blistering in some sections, and small pin holed sized craters in other sections. Small areas of damage can be patched instead of replacing the whole floor. The Square Grove Epoxy Flooring can help you with patching process.
Below is the patching process.
Patching Epoxy Floor Blisters
Sand Bubbles
Bubbles are small sphere protrusions or foam that appear on an epoxy floor surface. These blisters later burst due to foot traffic and leave small, pinhole circular craters. You cannot detect bubbles with naked eyes. The only way to detect them before they pop is by running your hands on the floor surface.
Why Bubbles Appear
Faulty surface preparation
Bubbles will occur when you overdo shot blasting. Aggressive shot blasting may cause extra-large holes on the substrate and open pores. These pores hold the air, which is trapped when you apply the epoxy coating. Air forms bubbles when trying to escape through the coat.
Improperly mixing the epoxy resin
Epoxy formulations get to you in liquid form. You get two-part resin and one part hardener. They should be mixed and carefully whipped with a mixing bit fixed on a drill. Mixing very fast or at high speed entraps air bubbles.
How to Patch up Bubble Damage
Bubbles make your coating rough and unsightly. Extended bubbling might resort to other epoxy failures such as peeling, chipping, and cracking. Patching the affected areas is way cheaper than recoating the whole surface. You can do the patching as a DIY project. It is advisable to get help from professionals such as Paradigm Concrete for Epoxy Floors Sarasota.
Here is how to do it.
Sanding
Sanding removes the bubbles and roughens up the affected area in preparations for a fresh coating. Sanding is done using a floor sander. A sandblaster uses hard grind stones or diamond abrasive discs to grind the bubbles off the surface. You can also use 60-grit sandpaper for the same purpose. Buying a one-time use sandblaster is expensive and wasteful. Rent one from home repair stores near you.
A Palm sander will do for smaller areas, while larger areas will require a floor buffer. Sanding is noisy and may raise a lot of dust. Wear personal protective equipment such as a respiratory face mask.
Shot Blasting
If you need a rougher profile, then sanding the short blasting will do. Unlike sanding, which uses abrasive discs, short blasters involve blasting the affected surface with high-velocity steel balls shot from a centrifugal machine. The machine then sucks up everything into an internal separation chamber where dust and reusable still shot are separated. The process used to be dusty, but some shot blasters come already fitted with internal filters to reduce dust emissions.
Cleaning the Floor
After the surface preparation processes, go over the surface with a shop vacuum cleaner. It will suck all the dust and solid particles on the surface. Trapped impurities may create air pockets which cause fresh bubbles or peeling on the new coat.
The last step in the cleaning process is wiping the substrate with a wet cloth. Here recommended solvents are used, preferably denatured alcohol. Dip a clean rag into the solvent. The rag should be thoroughly soaked but not dripping. Wipe the repair surface using circular motions.
Apply New Coating
Bristle brushes or paint rollers will do. Mix the epoxy resin per the manufacturer’s instructions until it is adequately mixed. Pour some on a paint tray. Roll your 9 centimeters paint roller on the paint tray. Apply a thin, even layer on the area you have prepared and cleaned. You can use a paintbrush for smaller floor sections.
Leave the patch to dry, usually between 4-10 hours. Check whether the coat has dried by pressing your thumb. It will not leave a print if the coat is dry. You can now apply the second or third coat as needed. Finish by sealing the patch with a clear coat floor sealer.
Bubbles appear because of air trapped between the coat and the substrate during installation. The patching process is inexpensive and straightforward. You can easily fix smaller sections with a floor sander or a shot blaster, denatured alcohol, and patching materials before they weaken the whole coating.


