
Transforming your kitchen doesn’t always mean breaking the bank or hiring expensive professionals. With a little creativity, some elbow grease, and the right guidance, you can create stunning DIY kitchen cabinets that deliver both functionality and style. In this guide, we’ll walk you through planning, designing, and building your kitchen cabinets—all while keeping your budget intact.
Introduction
DIY kitchen cabinets have become a popular trend for homeowners looking to upgrade their living spaces affordably. Instead of settling for off-the-shelf options or shelling out for custom cabinetry, do it yourself kitchen cabinets allow you to take control of the design, materials, and overall style of your kitchen. By choosing a DIY approach, you can tailor every detail to your taste, enjoy the satisfaction of a hands-on project, and ultimately transform your kitchen into a unique space that reflects your personality.
Whether you’re an experienced DIY enthusiast or a beginner taking on your first major home improvement project, this guide is designed to help you create cabinets that not only serve as practical storage solutions but also add a touch of affordable style to your home.
Planning Your DIY Kitchen Cabinet Project
Before you pick up a saw or hammer, planning is essential. A well-thought-out plan ensures that your project runs smoothly and meets your expectations.
Assessing Your Kitchen Space
Start by evaluating your kitchen layout. Measure the available space accurately and note down any architectural challenges such as uneven walls or low ceilings. Identify which cabinets need replacing and determine the ideal configuration for your new setup. Planning out the cabinet sizes, placement, and storage requirements early on can prevent costly mistakes later.
Design Inspiration and Style Choices
Decide on the overall look you want to achieve. Do you prefer a modern, sleek design or a rustic, farmhouse style? Browse through design magazines, online blogs, and social media platforms like Pinterest to gather ideas. Incorporate elements that complement your current decor while allowing you the freedom to introduce new textures and colors. Remember, your cabinets will be a focal point in your kitchen, so choose a design that resonates with your style.
Budgeting and Setting Goals
One of the major benefits of DIY kitchen cabinets is cost-effectiveness. Establish a realistic budget by listing all potential expenses, including materials, tools, and any additional hardware. Set clear goals and timelines for your project. A detailed plan not only helps manage expenses but also gives you a roadmap to follow from start to finish.

Materials and Tools: Building Your Cabinet Toolkit
Choosing the right materials and tools is crucial to ensure your cabinets are both durable and aesthetically pleasing.
Essential Materials
- Wood Options: Depending on your budget and desired finish, you can opt for solid wood, plywood, or MDF (medium-density fiberboard). Each material has its pros and cons; solid wood offers durability and beauty, while plywood and MDF can be more affordable.
- Hardware: Invest in quality hardware such as hinges, drawer slides, screws, and handles. The right hardware not only improves functionality but also enhances the overall look of your cabinets.
- Finishes: Consider paints, stains, or sealants that will protect your cabinets and add that final touch of style.
Must-Have Tools
Having the proper tools can make all the difference in a DIY project. Essential tools include:
- A circular saw or table saw for precise cuts
- A drill with a set of bits for assembling the cabinet parts
- A measuring tape and level to ensure accurate alignment
- Clamps to hold pieces together while the glue sets
- Sandpaper or an electric sander for smooth finishes
Sourcing Affordable Supplies
Look for local hardware stores, home improvement centers, or even online retailers that offer quality materials at competitive prices. Don’t overlook the option of purchasing reclaimed or discounted materials—they can add character and save money simultaneously.
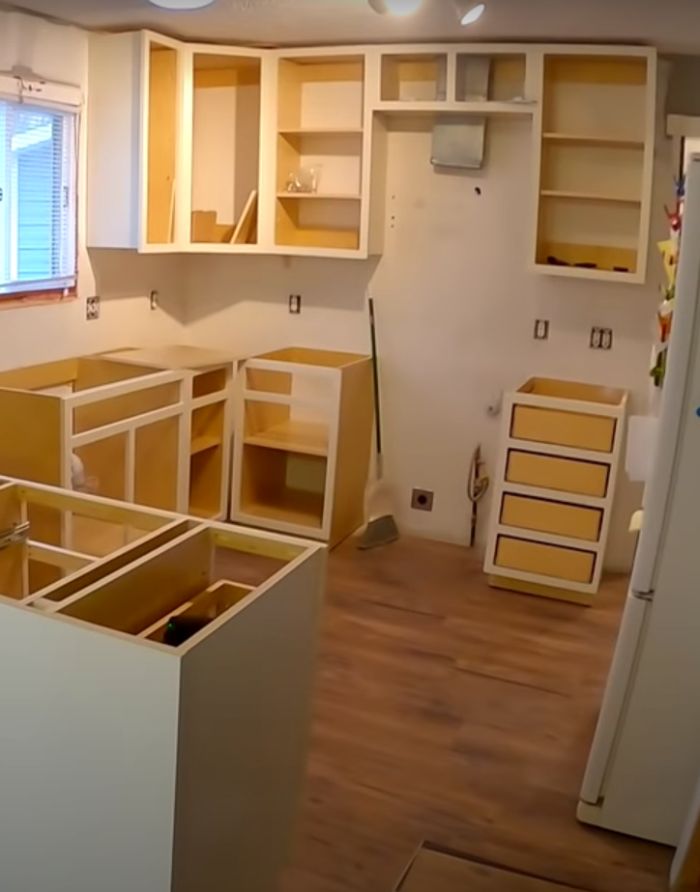
Step-by-Step Guide to Building Your Kitchen Cabinets
With a solid plan and your materials in hand, it’s time to get started on the assembly.
Step 1: Preparation and Workspace Setup
Clear your workspace and ensure you have all the necessary tools within reach. Safety should always be a priority, so equip yourself with protective gear such as safety glasses, gloves, and ear protection. Organize your materials and lay out a clear plan on a workbench or table.
Step 2: Removing or Modifying Existing Cabinets
If you’re replacing old cabinets, carefully remove them while protecting your walls. This might involve unscrewing them from the wall and clearing any remaining hardware. For those starting with a fresh canvas, ensure your walls and surfaces are clean and prepped for installation.
Step 3: Assembling Your DIY Cabinets
Follow the manufacturer’s instructions for any pre-cut components you’ve purchased. For custom-built cabinets:
- Cutting and Measuring: Double-check all measurements before making cuts. Precision is key to achieving a professional look.
- Building the Frame: Start with the cabinet box. Assemble the sides, top, and bottom using wood glue and screws. Reinforce joints with brackets if necessary.
- Installing Shelves and Dividers: Customize the interior by adding adjustable shelves or fixed dividers. This step is vital for optimizing storage and functionality.
- Door and Drawer Assembly: Construct the cabinet doors and drawers separately. Ensure that the doors fit flush within the frame for that signature inset look.
Step 4: Installation and Alignment
Mount your cabinets to the wall using secure anchors and a level to ensure they are perfectly aligned. Take extra time to check that the doors and drawers open smoothly and align evenly with the cabinet frame.
Step 5: Finishing Touches
The final steps include sanding any rough edges and applying your chosen finish. Whether you decide to paint or stain your cabinets, the finishing process is what elevates your DIY project into a polished piece of home decor. Install your hardware and make any necessary adjustments to ensure everything functions as intended.
Tips for Achieving Affordable Style
Creating a stylish kitchen doesn’t have to be expensive. Here are some ideas to enhance the aesthetic of your DIY kitchen cabinets:
- Customization on a Budget: Use peel-and-stick backsplashes, affordable decorative molding, or even stenciled designs to add a unique flair without high costs.
- Smart Finishing Techniques: Opt for a two-tone look or distressing techniques to give your cabinets a trendy, vintage vibe.
- Maximizing Functionality: Incorporate smart storage solutions like pull-out shelves, lazy Susans, or spice racks to keep your kitchen organized and efficient.
Troubleshooting and Common Challenges
Even with meticulous planning, you may encounter a few bumps along the way. Here are some common challenges and how to overcome them:
- Measurement Mistakes: Always measure twice and cut once. If something doesn’t fit perfectly, don’t be afraid to make adjustments.
- Assembly Issues: If parts don’t align as expected, take a step back and re-evaluate your instructions. Sometimes re-clamping or re-gluing can solve the issue.
- Hardware Problems: Inconsistent alignment of doors and drawers is often due to hardware issues. Check that all screws and hinges are installed correctly and tighten as needed.
Real-Life Success Stories and Inspiration
One of the most rewarding aspects of a DIY project is seeing the transformation through your efforts. Homeowners across the country have shared stories of how their DIY kitchen cabinets not only revitalized their spaces but also saved them hundreds, if not thousands, of dollars. From modern urban kitchens to cozy country homes, the possibilities are endless. Look for before-and-after galleries online and DIY forums to get inspired by real-life projects that mirror your vision.
Conclusion
DIY kitchen cabinets offer a perfect blend of creativity, practicality, and affordability. By taking control of the design and construction process, you can create a kitchen that reflects your style while meeting your storage needs. The journey from planning to finishing touches may require time and effort, but the end result is a space that’s truly yours—a testament to the rewards of do-it-yourself projects.
Transform your space with affordable style, and let your DIY journey inspire others to take charge of their home improvement projects too. Happy building!


