Refrigerators are your best friends, especially during summers when you love treating yourself with cool beverages and delicacies. And not just summers, your fridges are no less than a boon as an everyday staple that helps in keeping your food fresh. With so much functionality that your refrigerators tend to offer, it is quite a difficult thing to imagine life without a fridge.
But while you use them, you should also be particular about their maintenance so that it can serve you prolonged services. Dust accumulation over the condenser coils is a common culprit that deteriorates the performance of your fridge. Thus, cleaning the condenser coil is one of the primary requirements that every fridge owner should consider doing at least once in six months to keep your fridge function smoothly.
So, how to clean the condenser coils? Do you need to take help from professionals? Well, the good news is that you can do it all by yourself. Want to know how? Here is a guide that will help you out to get started with cleaning the condenser coils of your refrigerator:
Things you need for cleaning the condenser coils
Before you start off with the cleaning chores, make sure that you have all the necessary staples that you will require for cleaning the condenser coils. So here is what you need:
- Vacuum cleaner
- Crevice attachments
- Brush
- Rag
Guide to clean condenser coils located towards the posterior part of the refrigerator:
If you happen to find that your fridge is not functioning effectively and is lacking the cooling effect, then there are high chances that the condenser coils are the reason behind it. Even if you consider buying a fridge from the top 10 refrigerator brands in India but fail to maintain the condensers, you will always end up complaining about the effectiveness. Thus, it is mandatory to keep the condenser coils clean and free of dirt. So here is how you can go forward with its cleaning:
Unplug your fridge
One should always cut off the power supply before performing any cleaning or maintenance work. So, the very first thing that you need to do is to switch off your fridge so that you are not prone to any kind of electrocution risks.
Pull the fridge forward
Distance your fridge from the wall by pulling it forward, so that there is ample space for you to move around. If your refrigerator is kept on a stand with wheels, then pulling it forward can be an easy task, but if your fridge doesn’t have wheels, then you may require someone’s help for the same. But while you move it, make sure that you do it in a slow and steady process to prevent causing any damage to your refrigerator.
Spot the condenser coils
The condenser coils are found in two different locations. Firstly, on the backside of the fridge and secondly towards the bottom. The condensers that are located towards the posterior part of the refrigerator are easy to locate. All you need to look for is a metal grid at the back that contains the condenser coils.
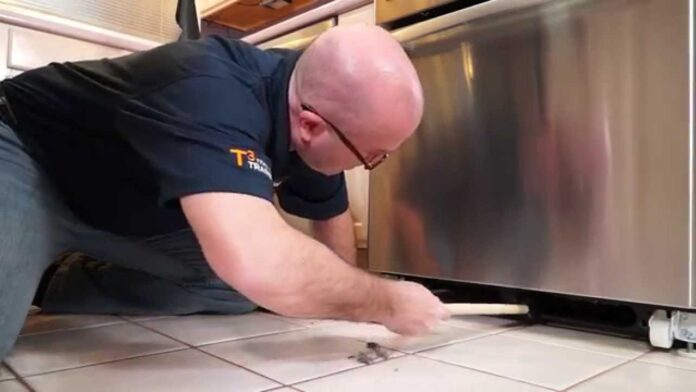
The coils that are located towards the bottom have a detachable grate over it, which can be removed for cleaning and maintenance purposes and can be attached over it again. This grate is usually located below the door of the fridge. For its removal, you can consider reading out the instruction manual so that things fall at the right place.
Open the grate and start cleaning
Since the grate remains closed always, you may not expect much dust and grit to enter it. But the truth is just the other side of the story. Due to the lack of cleaning schedules, the condenser coils can accumulate a good amount of dust and grime despite being covered by the grate. You can use the brush attachment of your vacuum cleaners to get rid of any dust, pet hair, grime that must have been deposited over the condenser coils.
There are a few attachments that come specifically designed for cleaning coils; you can consider using them for better efficiency. But the catch lies in going slow while cleaning so that you do not damage the coils in any case.
Use a paintbrush
After vacuuming, if you still find any dust particles that remain stuck on the condenser coil, then you can use a paintbrush to shove it off. Since paintbrushes are small and thin, you can reach out to all the nooks and corners of the condenser coils to get it clean as never before.
Clean the floors
If you happen to scatter dust and grit over your floors, consider cleaning the same so that it doesn’t fly and stick on the condenser again. It will force you to perform the cleaning chores again. So, clean the floors before you put the fridge back to its place.
Push the fridge backward
Now since you have cleaned the condenser coils of your fridge, you can push the fridge back to its original location. But make sure that you take proper care while pushing it back so that you do not accidentally trip over the tubes and wires.
Switch it on
Now since you are done with the cleaning chores, you can consider giving yourself a pat on the back. Now switch on the power supply & your fridge is all ready to use.
Conclusion
Condenser coils help in pushing out the heat, and thus cleaning them religiously helps in the proper functioning of your fridge. Keeping the condenser coils clean not only helps in maintaining good health of your fridges but also saves electricity. Yes, you have heard it right! Cleaning them also helps in saving on your electricity bills while keeping your food and beverages cool. So, what are you waiting for? Get started and DIY to keep your fridges working right. All the best!


